Cost Effective IPsec Site-to-Site VPN with Azure and UDM on Ubuntu 26.04 (strongSwan 6 and swanctl)
Intro
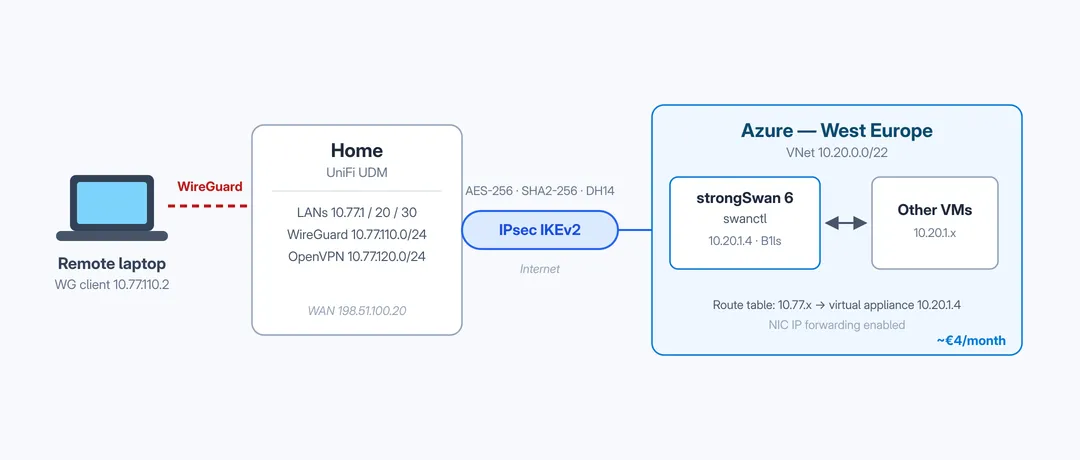
I wanted a permanent site-to-site VPN between my home network (UniFi UDM) and Azure, without paying for an Azure VPN Gateway (the cheapest usable SKU costs around €25/month, and that’s before you do anything with it). It turns out you can get the same result with a tiny Ubuntu VM running strongSwan for roughly €4/month.
Andy Kemp wrote an excellent guide on exactly this setup: Cost-effective IPSec Site-to-Site VPN with Azure and UDM. This post is not a replacement for it — go read it, the Azure portal part (resource group, VNet, VM, NSG rules) is still 100% accurate. But his guide uses the classic /etc/ipsec.conf and the ipsec command, and if you deploy Ubuntu 26.04 today you get strongSwan 6, where that whole interface (the “stroke” backend) is legacy. The modern way is swanctl with configuration under /etc/swanctl/.
So this post is the delta: the same setup, but with the swanctl configuration, plus a couple of gotchas I ran into that the original post doesn’t cover (remote VPN clients over the tunnel, ICMP redirects, and some scary-looking but harmless plugin warnings).
Throughout the post I use these example values, replace them with your own:
| What | Value |
|---|---|
| Azure VNet | 10.20.0.0/22 |
| Azure VM private IP | 10.20.1.4 |
| Azure VM public IP | 203.0.113.10 |
| Home (UDM) public IP | 198.51.100.20 |
| Home LAN subnets | 10.77.1.0/24, 10.77.20.0/24, 10.77.30.0/24 |
| Home VPN client subnets | 10.77.110.0/24 (WireGuard), 10.77.120.0/24 (OpenVPN) |
The Azure part (unchanged)
Follow the original post for this. In short:
- A resource group with a VNet (
10.20.0.0/22) and a small VM — aStandard_B1lsis enough, just pick Ubuntu Server 26.04 LTS as the image. - NSG inbound rules: UDP 500 and UDP 4500 from your home public IP, SSH only from your own IP.
- Make the VM’s public IP Static, otherwise the tunnel breaks every time the VM deallocates.
- Enable IP forwarding on the NIC (VM → Networking → network interface → IP configurations → IP forwarding). This is an Azure SDN setting, separate from the kernel one — you need both.
Installing strongSwan 6 the modern way
Instead of the strongswan metapackage (which still pulls in the legacy starter), install just the systemd daemon and the swanctl tool:
sudo apt update && sudo apt upgrade -y
sudo apt install -y charon-systemd strongswan-swanctl
Enable kernel IP forwarding with a drop-in file instead of editing /etc/sysctl.conf. I also disable ICMP redirects here — more on that in the gotchas:
sudo tee /etc/sysctl.d/99-ipsec-forward.conf <<'EOF'
net.ipv4.ip_forward=1
net.ipv4.conf.all.send_redirects=0
net.ipv4.conf.eth0.send_redirects=0
EOF
sudo sysctl --system
The swanctl configuration
One file replaces both ipsec.conf and ipsec.secrets. Generate a pre-shared key first:
openssl rand -base64 64Then create /etc/swanctl/conf.d/azure-udm.conf:
connections {
    azure-to-udm {
        version = 2                      # IKEv2
        local_addrs = %any               # the VM only knows its private IP, Azure NATs it
        remote_addrs = 198.51.100.20

        proposals = aes256-sha256-modp2048

        rekey_time = 8h                  # IKE lifetime, matches 28800s on the UDM
        dpd_delay = 30s
        keyingtries = 0

        local {
            auth = psk
            id = 203.0.113.10            # the PUBLIC IP, not the private one
        }
        remote {
            auth = psk
            id = 198.51.100.20
        }

        children {
            net {
                local_ts = 10.20.0.0/22
                remote_ts = 10.77.1.0/24,10.77.20.0/24,10.77.30.0/24,10.77.110.0/24,10.77.120.0/24
                esp_proposals = aes256-sha256-modp2048
                rekey_time = 1h          # ESP lifetime, matches 3600s on the UDM
                start_action = start
                dpd_action = restart
            }
        }
    }
}

secrets {
    ike-udm {
        id-1 = 203.0.113.10
        id-2 = 198.51.100.20
        secret = "your-generated-psk-here"
    }
}
A few translation notes if you’re coming from the original post’s ipsec.conf:
auto=startbecamestart_action = start(inside the child).dpdaction=restartbecamedpd_action = restart.- The PSK lives in the same file now, in the
secretssection, so:sudo chmod 600 /etc/swanctl/conf.d/azure-udm.conf. - I use
modp2048(DH group 14) instead of the original’smodp1024(DH group 2). DH group 2 is weak and strongSwan 6 really doesn’t like it; current UniFi versions offer DH 14 in the manual IPsec options, so there’s no reason not to. - The DH group has to appear in
esp_proposalstoo, not justproposals. UniFi’s manual IPsec enables PFS with the same group for phase 2, and strongSwan requires an exact match: leavemodp2048out ofesp_proposalsand the IKE_SA comes up fine while every CHILD_SA negotiation dies withNO_PROPOSAL_CHOSEN— the tunnel shows “offline” in UniFi even thoughswanctl --list-sasshows ESTABLISHED. Ask me how I know.
Start it:
sudo systemctl enable --now strongswan.service
sudo swanctl --load-all
The Ubuntu strongswan.service unit runs swanctl --load-all automatically on every (re)start, so the config also survives reboots. After future edits just run sudo swanctl --load-all again.
The UDM side and the route table (unchanged)
Again, follow the original post. On the UDM: Settings → VPN → Site-to-Site → Manual IPsec, with IKEv2, AES-256, SHA256, DH group 14, IKE lifetime 28800, ESP lifetime 3600, the same PSK, the Azure VM public IP as remote gateway and the Azure VNet (10.20.0.0/22) as remote network.
In Azure, create a Route Table with one route per home subnet (10.77.1.0/24 → next hop type Virtual appliance → 10.20.1.4, and so on) and associate it with your VNet subnet. You only need this for other VMs in the VNet — the strongSwan VM itself doesn’t need it.
Check the tunnel:
sudo swanctl --list-sas      # replaces "sudo ipsec status"
sudo journalctl -u strongswan -f
You want the IKE_SA in ESTABLISHED and the child in INSTALLED.
Gotcha 1: a wall of “plugin failed to load” errors
Every swanctl command on Ubuntu 26.04 prints a long list of these:
plugin 'aes': failed to load - aes_plugin_create not found and no plugin file available
plugin 'sha2': failed to load - sha2_plugin_create not found and no plugin file available
plugin 'gmp': failed to load - gmp_plugin_create not found and no plugin file available
...
This looks broken but is completely harmless: the Ubuntu strongSwan 6 build does all crypto through the openssl plugin and no longer ships the standalone crypto plugins, while the default plugin list still references them. As long as the last lines say successfully loaded 1 connections, 0 unloaded, you’re fine. You can verify the daemon has everything it needs with sudo swanctl --list-algs.
Gotcha 2: remote VPN clients can’t reach Azure
This one cost me the most time. Everything worked from my LAN, but not from my laptop when connected to home via WireGuard: pings to Azure just disappeared.
The reason: in IKEv2 the negotiated traffic selectors are the intersection of what both sides propose. The UDM (policy-based manual IPsec) automatically offers all of its local networks — including the WireGuard and OpenVPN client subnets, there is no setting for this on the UniFi side at all. But my remote_ts on the Azure side only listed the three LAN subnets, so the VPN client subnets were narrowed out of the tunnel. My WireGuard client (source IP 10.77.110.2) matched no IPsec policy on the UDM and the traffic never entered the tunnel.
The fix is entirely on the strongSwan side: add the VPN client subnets to remote_ts (as shown in the config above), then reload and bounce the tunnel:
sudo swanctl --load-all
sudo swanctl --terminate --ike azure-to-udm
Don’t bother with swanctl --initiate afterwards — thanks to start_action = start the tunnel re-establishes itself immediately with the new selectors. If you do run it you’ll get a confusing error about a “duplicate” CHILD_SA, which actually means: it’s already up. Verify with swanctl --list-sas that the new subnets are listed in the child SA.
And don’t forget to add the VPN client subnets to the Azure route table as well, otherwise other VMs in the VNet can’t answer your VPN clients.
Gotcha 3: ICMP redirects from the strongSwan VM
When another Azure VM sends traffic home, the packet enters and leaves the strongSwan VM through the same NIC. The kernel then helpfully sends an ICMP redirect back (“use 10.20.1.1 instead”), which shows up as noise in pings:
From 10.20.1.4: icmp_seq=2 Redirect Host(New nexthop: 10.20.1.1)In Azure this is harmless (the SDN routes by destination no matter what), but it’s ugly. That’s why the sysctl file above sets net.ipv4.conf.all.send_redirects=0.
Verifying the whole thing
The fun part. From my laptop, connected to my home WireGuard, a ping to a test VM in Azure:
64 bytes from 10.20.1.5: icmp_seq=1 ttl=62 time=52.6 msThe TTL of 62 (instead of 63 for the strongSwan VM itself) is the extra forwarding hop — proof that the packet went laptop → WireGuard → UDM → IPsec → strongSwan VM → test VM. And from that Azure test VM back home:
PING 10.77.1.1 (10.77.1.1) 56(84) bytes of data.
64 bytes from 10.77.1.1: icmp_seq=1 ttl=63 time=5.73 ms
Sub-6ms from Azure West Europe to my UDM. Not bad for €4/month.
Wrapping up
All credit for the original idea and the Azure walkthrough goes to Andy Kemp’s post — this post just brings the strongSwan side into the swanctl era and documents the sharp edges around VPN client subnets. As Andy also notes: this is great for a home lab, but for production workloads you should still use a proper Azure VPN Gateway with redundancy and support.
Related posts
-
Auto-scale GitHub Runners (and ADO Agents) with Azure Container Apps Jobs and Workload Profiles
Run self-hosted GitHub runners and Azure DevOps agents on Azure Container Apps Jobs with KEDA auto-scaling and Workload Profiles, deployed with Terraform.
-
Using Azure Managed Identity with .Net Core on Azure DevOps Agents
Run .NET Core code that uses Azure Managed Identity and the AppAuthentication library on Azure DevOps hosted and private agents, with MSI workarounds.
-
Create an Event Grid Subscription to an Azure Function V2
Create an Event Grid subscription to an Azure Functions V2 Event Grid trigger, including the changed SystemKey endpoint and a PowerShell automation script.